Last updated on 9th August 2023
When’s the last time you read a map?
Thanks to Google Maps and other satellite navigation apps, the answer could be never.
According to a recent study, 1 in 7 millennials have never read a map, and only 18% feel ‘very confident’ in their ability to read one.
With all of the other options available, people are spending less time looking at road maps. And this accessibility and breadth of options has also affected user journey maps.
With all of the different ways users can communicate with your brand – email, social media, apps, brick and mortar stores, websites, review sites – it can be tough to track the journey that led them towards becoming a new user of your product or service.

But we’re here to make it less tough!
In this article we’re going to take a look at how to create a user journey map – made simple!
What is a user journey map?
A user journey is the path a user takes, across different touchpoints, while interacting with your brand.
A user journey map, more specifically, is a visualisation of this journey. It can help you understand how users are interacting with your brand, product, or service – and what their needs, motivations, and pain points are.
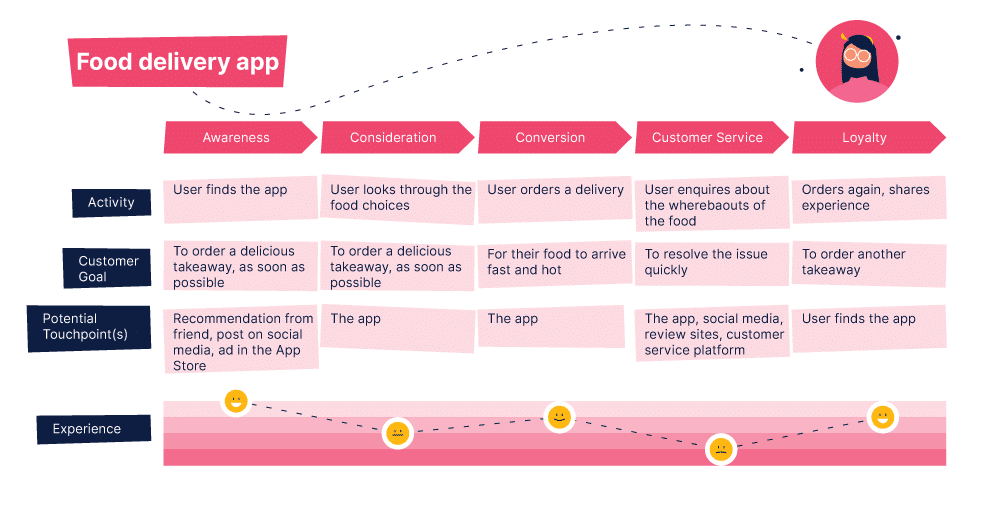
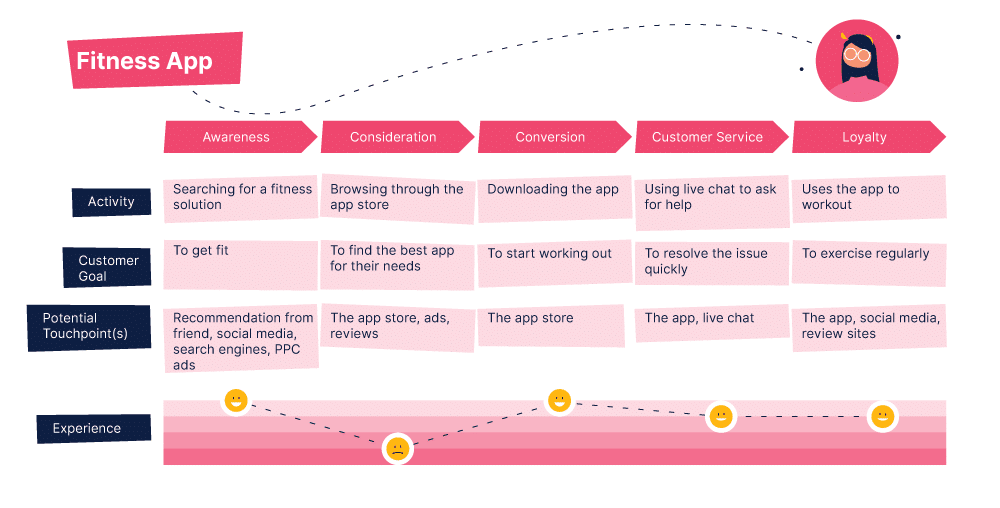
User journey maps differ from company to company, and industry to industry. But they always reflect a timeline that outlines important steps in the user journey. Here’s an example for a food delivery app:
And here’s another one for a fitness app:
Why you need a user journey map
Finding out more about the user journey can help you to better understand your customers’ motivations and pain points.
And this insight can help you to improve your onboarding of new customers. For example, if you spot a part of your onboarding flow that has a lot of drop-off, a user journey map can help you to understand the reasons behind that drop-off, and ultimately remove or improve that section of your onboarding.
Even if you feel like your user journey is pretty good right now, mapping it out will give you more of an in-depth overview. And this could allow you to create a more memorable experience for your users.
After all, why settle for ‘pretty good’ when you can make it awesome?!
How to create a user journey map
Okay, now into the good stuff! Grab a notepad and pen, or maybe open a fresh Google Sheet, as we take you through four simple steps that will help you create a user journey map.
Step one: Research your users
To understand the journey your users take, you must first understand your users.
If you haven’t done so already, then you’ll need to create buyer personas for your users. Buyer personas are fictional representations of your ideal customers.
When creating a buyer persona, you should go into as much detail as you can for each type of customer you have – think about their age, their home life, their worklife, any struggles they have, and so on. The aim is to make this person as tangible as possible. Here’s an example for a food delivery app:

In addition to creating buyer personas, you can also survey your current customers to find out more about them.
For each user journey, it’s important to understand 4 key things:
- Customer goals
- Touchpoints
- Customer activity
- Customer pain points
By creating a user experience survey about your app, product, or service, you could uncover some things about the user journey that you may not already know.
It’s really easy to send out a survey using a platform like SurveyMonkey. Here’s a quick example we made using the Customer Satisfaction template:
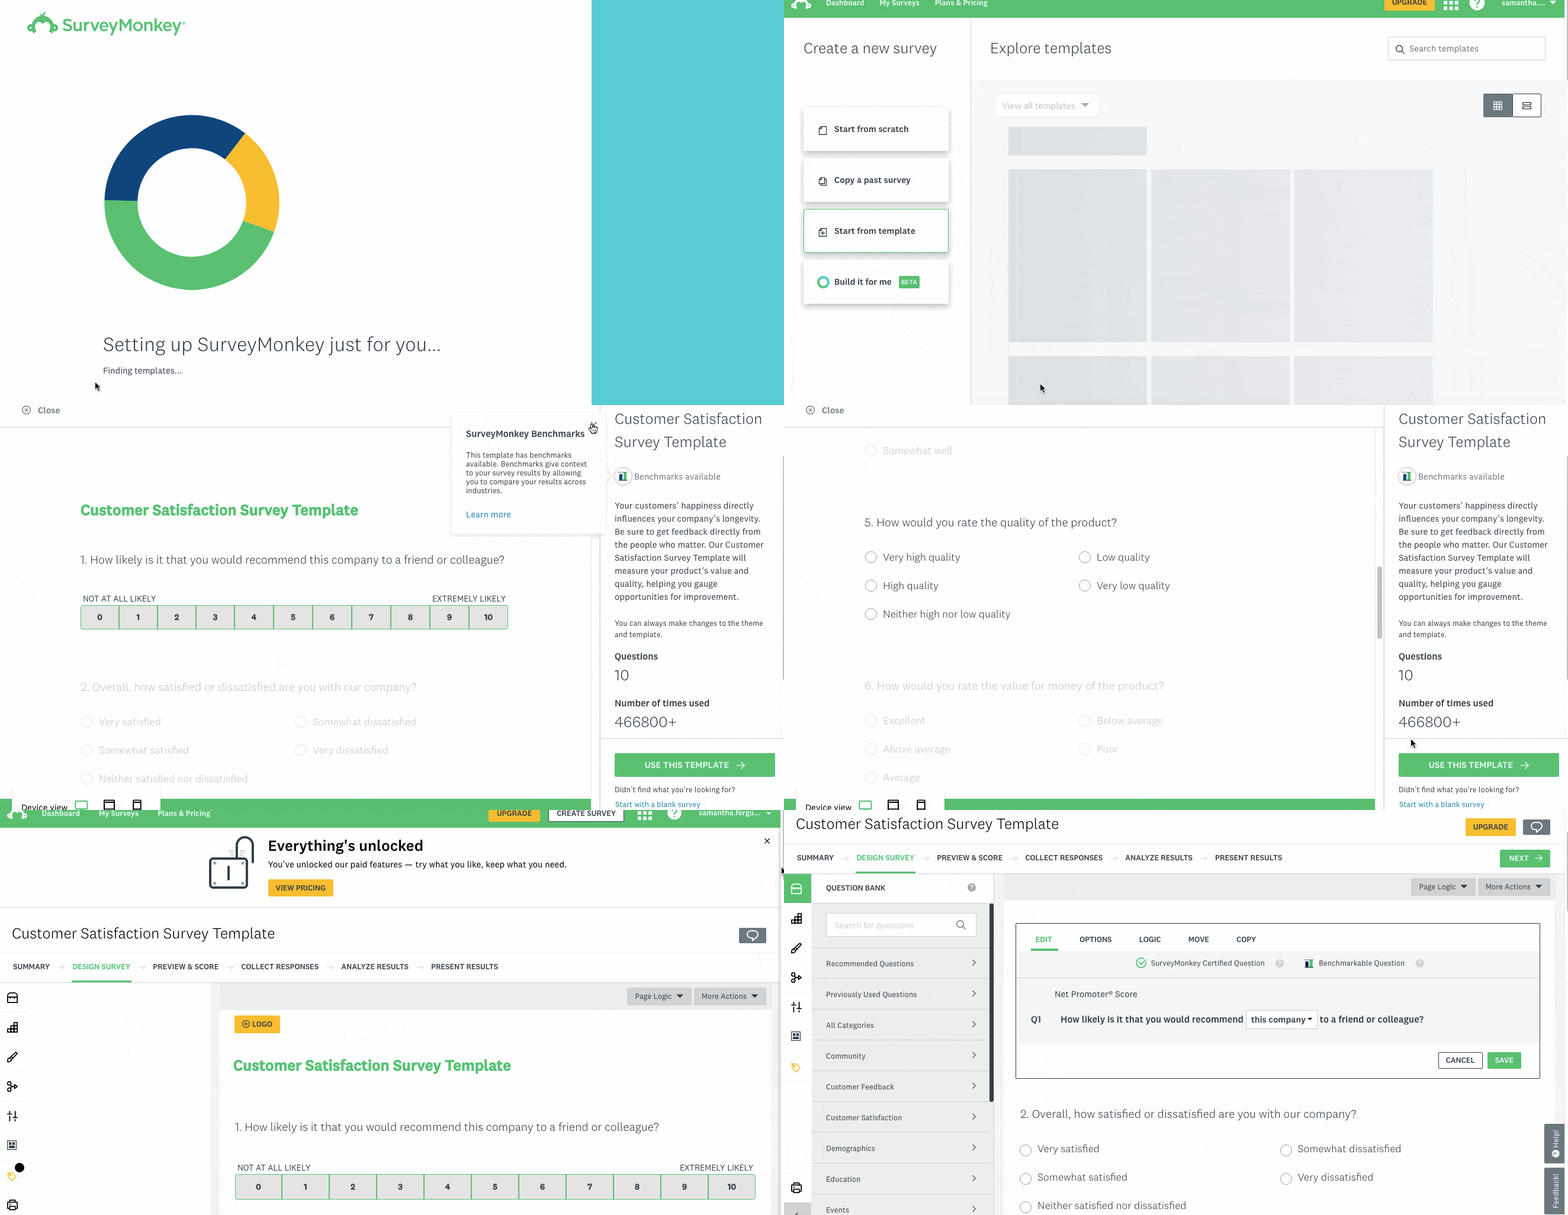
SurveyMonkey pulls everything together in seconds, and all of the questions can be customised and personalised to fit your brand.
Step two: List your touchpoints
The next step is to list all the possible touchpoints that your users could interact with along their journey with your app, product, or service.
This is important because it gives you an insight into how customers are discovering you and can also inform you of any overlaps and/or gaps in your user journey.
For example, you could discover that people are coming to your site very early on in the user journey, but because they are missing out steps that could help them build knowledge about your product or service, they aren’t seeing the value – and therefore aren’t converting.
Potential touchpoints could include:
- Social media
- Review sites
- Word of mouth
- Email marketing
- Video marketing
- Paid ads
…the list could go on and on. It’s basically anywhere, online or offline, that users could hear about you.
It also helps to check your analytics software and find out which sites are backlinking to you – as this is another potential source of discovery for new users. If you don’t currently have any analytics software, then Google Analytics is a good place to start.
Step three: Sketch out the journey
Now that you have your buyer personas and all of the touchpoints listed, you can use these together to sketch out a user journey – from awareness (just discovering your brand) to loyalty (falling madly in love with your brand).
To start, create a chart that has 6 columns and 5 rows. This is easiest using a spreadsheet software, like Google Sheets.
Your columns should be labelled as each step in the user journey and your rows should be labelled for the four key things we mentioned above – goals, touchpoints, activity, and experience (experience covers ‘pain points’). The top row should include the name of your brand. Here’s an example:

Next, you’ll want to start filling out your journey, one column at a time. A fun way to do this is to take the user journey yourself – as if you’re discovering your brand for the first time.
This activity of viewing your brand with fresh eyes will help you to spot any friction, repetition, or gaps that new users may come across when embarking on your user journey.
If you do find anything that makes the user journey difficult then it’s important to implement changes to fix that.
Step four: Put it all together
Finally, it’s time to put everything together to create your user journey map.
We included some fake examples above, but let’s take one last look at what a user journey would look like for a real company.
Here’s a user journey map that we mocked up for travel company, Airbnb:
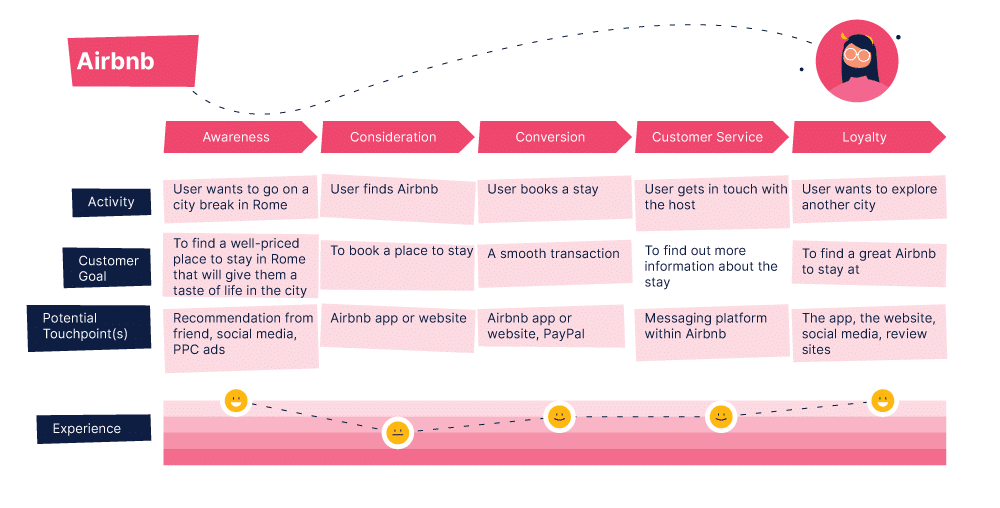
As you can see, the customer’s goals are clearly mapped out and all of the potential touchpoints that they interact with are considered. The experience graph also helps to show how new users may be feeling throughout the journey.
Of course, there are many, many different ways to create a user journey map. This is just our simple ‘beginner’s map’ to help you get started. As you begin using your map, you’ll probably find ways to tweak it to make it work in the best way for you.
Final thoughts
The first map was thought to have been created in the 6th century BC! And they’ve been telling us where we need to go ever since.
Your user journey map will help you visualise the steps that your users take and the experiences they have – both positive and negative – on the road to becoming a customer. Helping you to improve that journey, and increase your number of happy users.
For more information on how to start the user journey with a bang, take a look at our onboarding videos.

