Last updated on 10th November 2023
Livestreaming on YouTube has become increasingly popular over the past few years. It allows creators to broadcast live video to their audience in real time. From gaming streams to product launches and Q&As, livestreaming opens up many possibilities for engaging with viewers.
In this article, we’ll walk through everything you need to know to livestream successfully on YouTube. We’ll cover the equipment you need, tips for planning your livestream, and step-by-step instructions for going live on YouTube. Whether you’re just getting started or looking to improve your existing livestreams, this guide will help you connect with your audience in an exciting and interactive way.
By the end, you’ll have the knowledge to create professional, high-quality livestreams that help boost your YouTube presence. So let’s dive in and explore the world of YouTube livestreaming!
How to livestream on YouTube via desktop
To livestream on YouTube via desktop, you’ll need:
- A computer or mobile device – This is what you’ll use to manage your stream and broadcast your content. Any relatively modern smartphone, tablet, laptop or desktop computer will work.
- A webcam – The webcam built into your computer or smartphone should suffice for basic streaming. For higher quality, invest in an external USB webcam.
- Microphone – Audio quality is important for live streams. The microphone built into your device can work, but you may want to consider getting a USB microphone for best audio.
- Streaming software – YouTube provides software to help you set up and manage live streams right from your YouTube account. This includes YouTube Studio for desktop and the YouTube Studio app for mobile.
- Internet connection – You’ll need a high-speed, stable internet connection to maintain a smooth stream. Ethernet or 5Ghz WiFi networks are recommended over 2.4Ghz networks.
You’ll also need a verified channel in order to be able to livestream, a process which can take up to 24 hours – so good to leave yourself a little buffer, rather than hoping to just dive straight online!
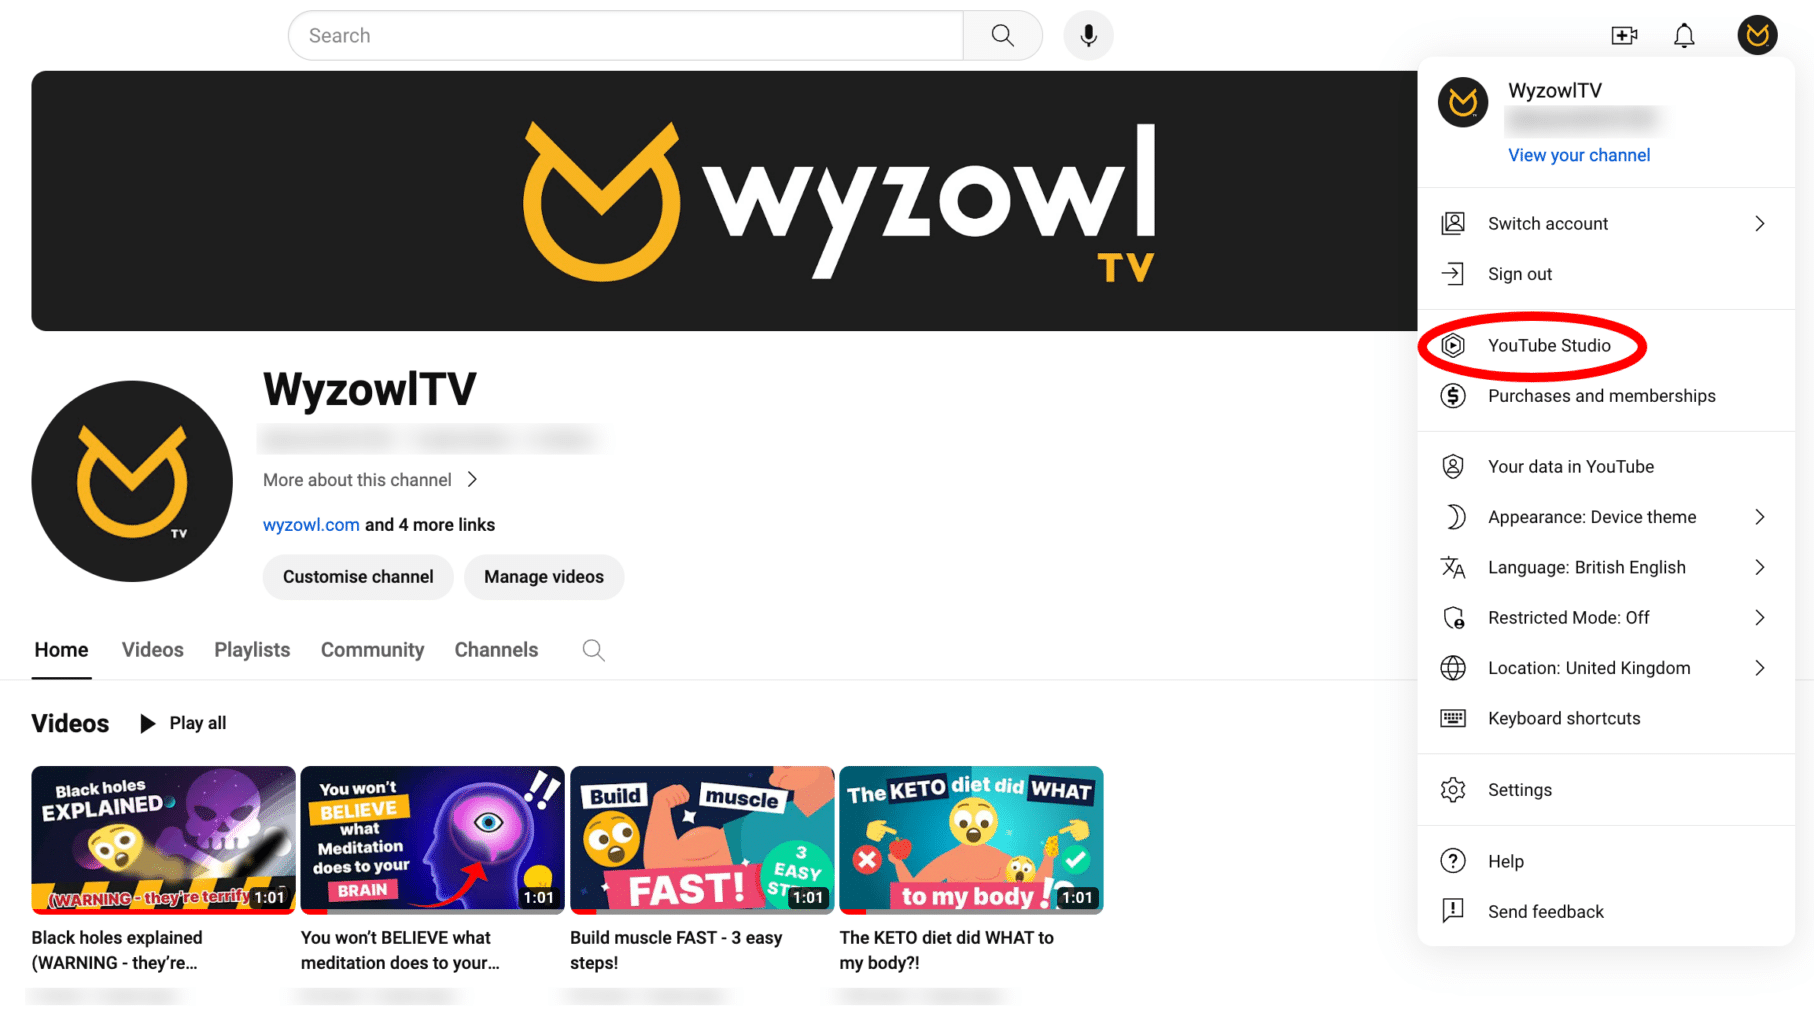
The first thing you need to do is head to YouTube Studio. You can find this by clicking your profile pic in the top right corner, then select ‘YouTube Studio’ from the drop down menu.

From there, you can either hit the ‘Go Live’ button on your Channel Dashboard…

…or select ‘Go Live’ from the ‘Create’ button in the top right.

You’ll be greeted with this page which is your control panel for all things live streaming!

If you’re not yet set up for live streaming, this will automatically trigger a request through YouTube for your channel to be given this power.
If you do have this permission already, you’re in luck and can go live right away. Simply click the ‘Webcam’ option to give YouTube permission to use your webcam and mic…

You’ll then need to give some details about your stream, which includes a title, description, category, thumbnail and more.

The Monetisation tab will let you set up how your stream is monetised.
Customisation lets you tailor your stream with things like live chat, participant modes and message delays to help you filter out any nasty or inappropriate stuff.
Finally visibility lets you specify whether your stream’s going to be private, unlisted, for members only, or totally public.
On this menu you can also schedule your live stream. By default, YouTube uses the current date and time – which is fine if you wanna go live right away. But you can easily pick a date for the future and hit ‘Done.’ Your stream’s now created – yay! You can preview all details within the stream menu, and change any details by hitting ‘Edit’ up until the point you go live.
How to livestream on YouTube via mobile
Livestreaming on YouTube via mobile comes with some additional requirements.
For one thing, you need to have at least 50 subscribers. If you’re between 13-17 years old, the bar is higher – you need 1,000 subscribers before you can livestream to a public audience.
If you’ve got over 50 subscribers but under 1,000, YouTube will limit the number of viewers on your live streams. Your archived streams will also be private by default. A few weeks after you reach 1,000 subscribers, these limitations are removed and you can forget about the red tape!
To get started livestreaming on YouTube, simply open the YouTube app on your mobile device and tap “Go Live.” You may need to wait 24 hours before live streaming for the first time. Make sure to check the privacy settings and other options before starting your stream. When you’re done, tap “Finish” and your stream will be archived on your channel.
Now that you know how to live stream, let’s get into some tips that will make your live stream the best it can be…
15 top tips for your YouTube livestream
1. Promote!
It’s not a given that people will watch your live video if you provide them with a link a few minutes before. (Of course, impromptu live streams are still likely to attract a crowd, but the aim is to maximise the size of that crowd!)
So if you’re thinking of planning a live stream in advance, head over to your YouTube channel homepage and schedule one, using the ‘events’ option.
This then allows you to promote the live stream before it actually takes place. Using social media is a good first port of call. You can simply tell your audience where and when you’ll be streaming or you can think a bit further outside of the box.
You can create a ‘live stream trailer’ using footage from either your previous live streams or pull footage from your YouTube videos. Then share it widely over your various social channels to entice your viewers.
If you’re posting regular vlogs or other content make sure to mention that you’re planning on live streaming. Chances are, if people are interested in your regular content, they’ll be potential viewers of your live streams too.
If you’re planning on making a habit of doing regular live streams, why not change the header or artwork on your YouTube channel homepage to reflect this?
You can use a tool such as Canva, that lets you build professional social header images. It’s really easy to use with a simple ‘drag and drop’ functionality, and there are tons of templates to help you get started.
This makes it as easy as possible for a viewer to find your live stream- this is always the main aim!
2. Think about your surroundings
Think about your location carefully, and all of the factors that are going to affect your viewers’ experience.
It’s no good if your audience is straining to hear to you over tons of background noise, so pick somewhere that you’re in control of the volume of things around you.
Give your viewers something interesting to look at, whether you’re in a home studio or a more professional setup, the personal touches are best. A backdrop like a jazzy curtain or a decorated wall will be enough.
While you can stream from anywhere, it’s important to consider the decor of the space you’re in and what message it’s conveying to your viewers.
3. Start ahead of time
Don’t wait until the exact time you have planned your live stream to get in position. Log in a few minutes earlier, get yourself in front of the camera, check all of your equipment is working correctly and most importantly, loosen up a little!
You can also use this time to send a link to your stream via an update on your social media accounts- making it as easy as possible for your viewers to head over to your live stream.
4. Take your lighting to the next level.
When you’re lighting a live video you first need to make sure the host and any other guests are evenly lit and easy to see.
It’s important to make sure the lighting is flattering and presents a clear picture to your audience.
Unlike traditional ‘narrative’ lighting which tells a story, lighting for live video is all about the content of your live broadcast.
Check out this lighting video by PocketLIVE TV or Wistia’s Down and Dirty DIY Lighting guide as a great starting point.
5. Always have a backup
Always have a backup of EVERYTHING. Computers, cords, cameras and audio cables especially.
Also, keep your devices charged and ready at all times, and it’s a good idea to keep a spare battery charged up because live streaming can be really draining on battery life.
6. Look at the camera!
It may sound obvious, but always make sure you are looking at your camera, which is essentially your audience.
A reference monitor on a camera is a great tool for knowing how your stream looks for your audience, but it’s so tempting to keep looking at it. Resist the urge to stare at the monitor for longer than needed, to make sure your eyeline into the camera lens is correct.
7. Have somebody monitor your stream
Having an extra set of eyes on your live stream is very important. So whether they are watching along in the same room, or watching remotely from a different location, as long as they can be in touch with you, it’ll work.
This extra person can provide support and inform you of any problems that you can’t see, such as audio sync issues and choppy frame rates.
8. Be consistent
If you’re looking to build up a following try to go live at a regular, consistent time. An irregular frequency or timing of live streams can become frustrating to an audience.
Being consistent also makes things much easier for you! Keeping a regular schedule allows you to market and promote your stream in advance, and you can even consider scheduling your social media posts if you’re super busy.
9. Add a co-host or a special guest
Being able to vibe and bounce off a co-host or special guest can make your live stream more engaging for the audience. The added insight can add a fresh perspective to make your live show more interesting for viewers.
Having a guest on your live stream is also the perfect opportunity for cross-promotion. You can promote your guest to your audience, and your guest can promote you to their audience.
If you can convince a well-established influencer to collaborate with you on a live stream, you’re going to be able to attract an even wider audience. There are tools available to help you connect with influencers:
These platforms allow you to find influencers that would be suitable to collaborate with, and contact them directly.
10. Respond to the comments in real time
Viewer comments have a limited shelf life, so it’s best to get to them quickly. Replying to them live is best (if possible!) and if you can’t do that, then straight after the show will work.
Interacting with your viewers in this way helps boost your engagement with them and keeps them coming back to your live streams again and again.
11. Rehearse (just a little bit!)
Now, we aren’t saying you need to rehearse line by line, but having a good idea of what you’re about to say and do is essential.
If you’re live streaming with a crew, chat with them beforehand so everyone’s on the same page.
Make a list of everything you need to do before your broadcast i.e set-up, mic check, rehearsals, rundowns, bathroom breaks, etc.
When you have a good run through, it’s much more likely your live stream will go according to plan.
12. Choose the right topic
While it may seem obvious, you need to make sure you’re talking about something that’s going to resonate with your audience.
Look at what content has worked in the past, you can do this by using Google Analytics to see what content is working on your website. Have a look at which posts are receiving the most traffic- chances are these topics will perform well during a live stream too.
Also, check out what content your competitors are releasing for a bit of inspiration (and make yours better).
Trending topics in your industry is a great place to look for some ideas- people are usually searching for content around popular topics, so make sure they’re coming to you!
13. Have the right equipment
One of the most important things, if not the most important thing to consider when starting to live stream, is the equipment you’re going to use.
You’ll need to have the following:
- Reliable internet connection– at least 1.5 Mbps upstream bandwidth or 4G for mobile purposes.
- Dedicated encoder– an encoder is necessary so you’re able to capture and broadcast your stream in the first place.
- Computers with high CPU– your computers must be able to handle the demands a live stream puts on your machine. Dual-core computers are the best, and it’s best to make sure the only thing your computer is used for at the time of streaming is the live stream.
- Webcam– webcams should be capable of capturing video at a resolution of at least 720p, though 1080p would be even better.
- Microphone– any microphone used should be capable of blocking out most of the unnecessary noise around you.
- A backup option– if possible, you’ll want to have a backup stream running in case your initial one fails. This means two different encoders, preferably on two different networks.
- Mobile streaming equipment– you’ll either need to make sure your mobile device is set up correctly for live streaming, or buy some add-on equipment to optimise it.
14. Monetise your streams
Monetising your live stream on YouTube can get a little complicated. Firstly, your channel needs to:
- Be monetised (learn how here)
- Have over 1000 subscribers
- Have more than 4000 watch hours in the last 12 months
And you must be:
- Over 18
- In an available location
If your channel is enabled for monetisation, YouTube will trigger ads on your content. Ad serving is not guaranteed and not all viewers see the ad, live streams can be eligible for:
- Pre-roll ads that run before the live stream (mobile and desktop)
- Mid-roll ads run during the live stream (desktop)
- Display and overlay ads run beside or over content (desktop)
You can also earn revenue on your live streams by enabling ads and using Super Chat.
15. Make use of YouTube Live features
YouTube Live has lots of handy features to help make live streaming that little bit easier- and advanced, with a small amount of effort.
- Live automatic captions– these can provide accessibility for new audience members, allowing people to follow along with no sound.
- Location tags– by adding a location tag to your live stream, you’re allowing your viewers to have even more insight into your content! This is especially useful for content that provides insight of different locations, such as countries, shops or restaurants.
- Super chats– this allows viewers to purchase a ‘super chat’ when they are watching live streams. A super chat is a highlighted message that sticks out from the rest of the chats in order for people to gain your attention during the stream.
Making the most of these additional features can really elevate your live streams to the next level.
Following the above steps and tips will give you a great lift off for creating live content. Remember practice makes perfect, and getting started may be a challenge.
But with consumers crying out for more live video content, it’s time to say ACTION and go live in 5, 4, 3, 2, 1…
To learn more about escalating your YouTube channel higher, check out How to Get More Views on YouTube and YouTube Banner Dimensions 2024.


